Home Canning
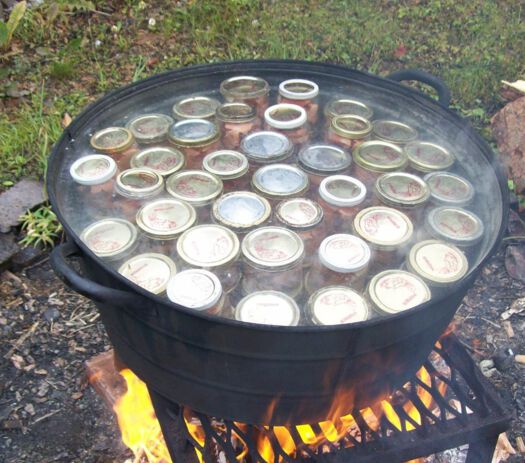
Home canning is a way to preserve fresh foods in glass jars. The two methods suitable to safely preserve a seasonal harvest are hot water bath canning and pressure canning.
Hot Water Bath
Uses boiling water to sterilize food and kill microorganisms. Suitable for high acid foods such as peaches and pears. Most fruit and fruit sauces can be processed this way.
Pressure Canning
Uses high temperatures and pressure to sterilize and kill microorganisms. Suitable for low and high acidic foods. Low acidic foods require high temperatures because of their tendency to grow botulism. Vegetables, meat and game, poultry, seafood, soups, stews, tomato-vegetable sauces and tomato-meat sauces are all low acid foods.
Find More Info on the Web
www.food.com/topic/canning
www.ballmasonjars.com/canning-preserving-guides
Canning Tips
It is important that:
- Jars are designed to be used for home canning and are free of structural defects.
- Equipment is sterile: jars, lids and seals. Sterlize in rapidly boiling water for 10 minutes.
- Ingredients like salt, sugar and vinegar are important to the taste and texture. Use measured amounts.
- Follow recommended processing times. Under processing could allow harmful organisms to survive.
Dehydrating
Microorganisms need moisture to grow, and die off in dry conditions. Dehydrating is a traditional method of preserving locally produced food. Food can be dried using an electric dehydrator, the sun or an oven. Properly dried and stored
food can last many years.
Once dehydrated, the food does not take up a lot of storage space and is great for camping and hiking trips. Drying food is the world’s oldest known preservation method; dried fish has a storage life of several years.
10 Tips on Dehydrating Food
- Start with fresh, high quality food.
- Always check food for spoilage or bruising.
- Remember to slice food uniformly and thinly.
- Space food evenly apart on food trays.
- Blanching certain vegetable before dehyrating can help fight bacteria and preserve colour and flavour.
- Marinate, salt, spice or sweeten foods before dehyrdrating to increase flavour.
- When oven drying, a good temperature is 50-60° Celsius, (122-140° Farenheit).
- Turning food and rotating trays during drying ensures even dehydration.
- Fruit is ready when there are no pockets of moisture and feels leathery to touch. It is important that vegetables are crispy and meat is tough when dehydrating process is complete.
- Cool dehydrated food before storing and store in airtight containers or use a vacuum sealer.
Find More Info on the Web
www.easy-food-dehydrating.com
www.howtowilderness.com/food-dehydration
Freezing
Freezing vegetables at home is a fast, convenient way to eat locally grown produce year round. Freezing preserves produce at peak maturity and nutritional quality.
Blanching is boiling vegetables before freezing. Blanching preserves quality by destroying the enzymes that alter their colour, texture and flavour during storage.
Berries freeze well and can be used frozen for smoothies or thawed for use in baking and sauces. When thawing, berries tend to lose their shape as well as some of their juice, so place freezer bags of berries on a baking sheet or in a bowl to thaw in case the bags leak. Wash the berries and pat dry. Arrange the whole berries on a baking sheet and freeze until solid. This keeps the berries loose and makes measuring and thawing easier.
Transfer the frozen berries to freezer bags or freezer containers. Leave a little space at the top of the bag or container, because the berries might expand a little.
Lay bags of berries flat in the freezer. You can also place the bags on a tray or baking sheet first to assure a flat surface. Add bags or containers of berries to the freezer in batches to make sure they freeze quickly, and leave room around each to allow air to circulate. You can stack the bags or containers once the fruit is frozen. Freeze berries for up to 12 months.

Blanching Times for Common Vegetables
| Beans | Trim ends, leave whole or cut into pieces | Whole beans: 5-7 min. Cut beans: 4-6 min. |
| Broccoli & Cauliflower | Remove woody stems, cut into 3 cm pieces | 3 minutes |
| Brussel Sprouts | Trim stems and outer leaves | 4-6 minutes |
| Cabbage | Trim outer leaves and core. Cut into wedges or shred coursely | Wedges: 5 min. Shredded: 1 min. |
| Carrots | Remove tops, cut large carrots into 1 cm slices | 3 minutes |
| Garlic & Onions | Remove outer skin | Do not blanch. Freeze on trays and transfer to bags when frozen |
| Greens - Beets, Swiss Chard, Kale, Spinach, Turnips | Remove tough stems | 2 minutes |
| Herbs | Chop or slice | Do not blanch. Add frozen during food prep |
| Peas | In or out of shells. Include edible pods | 2 minutes |
Vegetable Storage
In the north, storing vegetables purchased from local producers ensures year-round benefits. Here are a few general guidelines to ensure success:
- Do not store fruits and vegetables together.
- Store only fully mature vegetables. Immature fruits and vegetables will rot quickly.
- Pack vegetables loosely. The closer they are, the quicker they will rot.
- Remove all excess soil. Don’t wash the vegetables, just let them dry and brush off the soil.
- Keep the storage area dark.
- Do not expose stored vegetables to temperatures below freezing.
Vegetable Storage Chart
| Vegetable | When to Harvest | Storage Preferences | Months of Storage |
| Beets | At 1-3 inch diameter | Cold-Very Moist 0-4°C 90-95% Humidity | 5 |
| Cabbage | When head feels firm | Cold-Moist 0-4°C 80%-90% Humidity | 5 |
| Carrots | When shoulders are 1 inch in diameter | Cold-Very Moist 0-4°C 90-95% Humidity | 8 |
| Garlic | When lower leaves brown | Cool-Dry 0-10°C 60%-70% Humidity | 4-8 |
| Onions | Once necks are tight and tops fall | Cold-Dry 0-10°C 60-70% Humidity | 4 |
| Parsnips | After a hard frost | Cold-Very moist 0-4°C 90-95% Humidity | 4 |
| Potatoes | When the vines die back | Cold-Moist 0-4°C 80-90% Humidity | 2-4 |
| Pumpkins | When the shells harden | Warm-Dry 10-15°C 60-70% Humidity | 2 |
| Rutabagas | At your preferred size | Cold-Very Moist 0-4°C 90-95% Humidity | 4 |
| Turnips | After light frost Cold-Very Moist | 0-4°C 90-95% Humidity | 4 |
| Winter Squash | When shells harden | Warm-Dry 10-15°C 60-75% Humidity | 2-6 |
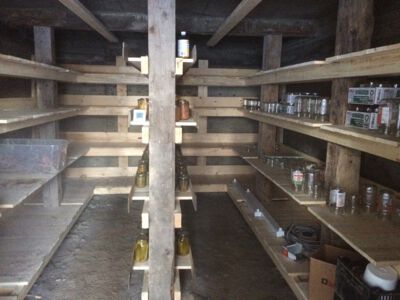
Good Places to Store Vegetables
Basements - Cool, dry basements will keep most vegetables
for at least a couple of months. Make sure there is adequate
air circulation and ventilation.
Attics and Entryways - If these spaces are unheated but
don’t freeze, they can be used for spreading out and storing
vegetables that like dry conditions.
Root Cellars - For cold, moist storage a root cellar is ideal.
It can be anything that remains above freezing, from a bucket
in the ground, to a crawlspace under a porch, to an unheated
section of the basement, to an underground enclosure in the
side of a hill.
Root Cellar Tips
- Temperature stability in the north is reached at 10 feet (3m) deep.
- Stay away from large trees; the tree’s roots can be difficult to dig through, and will eventually grow and crack the cellar walls.
- Inside use wooden shelving, bins, and platforms because wood does not conduct heat or cold as quickly as metal.
- Air circulation, ventilation, is critical for minimizing airborne mold. An intake should be located on the low side of the cellar while positioning the outlet near the ceiling of the storage unit.
- Shelves should stand 1 to 3 inches (3 to 8 cm) away from the walls.
- For outdoor root cellars, packed earth is the preferred flooring.
- Every root cellar needs a thermometer and a hygrometer (to measure temperature and humidity).
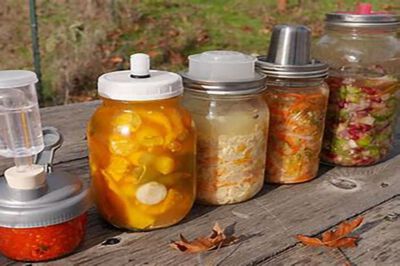
Fermentation
Fermentation is an ancient form of food preservation. The process produces traditional dill pickles and real sauerkraut. It takes nothing more than salt, vegetables and water - no canning, no fancy equipment.
Almost any vegetable can be fermented. Fermenting locally produced farm-fresh produce is a great way to provide good nutrition year-round. Ferment one vegetable alone or create a mix of many different kinds, along with herbs and spices, for a great variety of cultured foods.
Easy Two-Stage Process
Step One
In stage one, vegetables are submerged in a brine that is salty enough to kill off harmful bacteria while leaving the good bacteria to survive.
Step Two
In stage two, the good bacteria, called Lactobacillus organisms, begins converting lactose and other sugars present in the food into lactic acid. This creates an acidic environment that safely preserves the vegetables and gives fermented food their classic tangy flavour.
Popular foods such as dill pickles, sauerkraut and yogurt are fermented foods.
Recipes
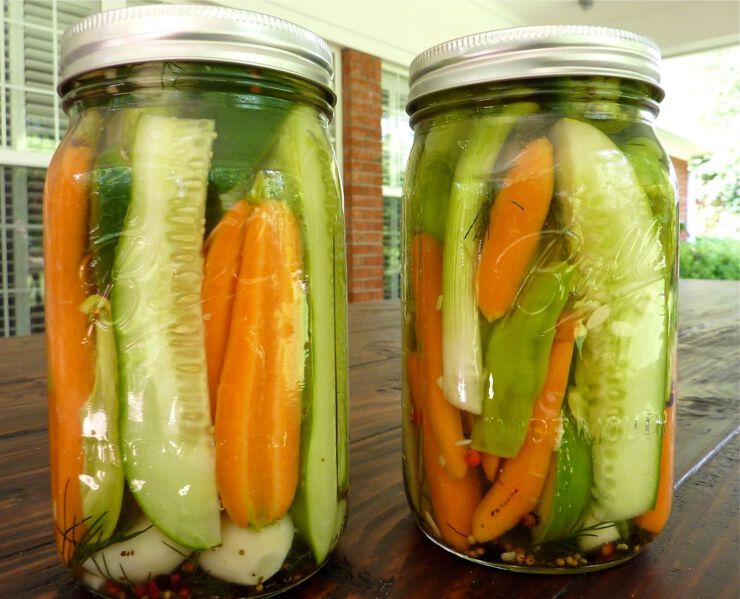
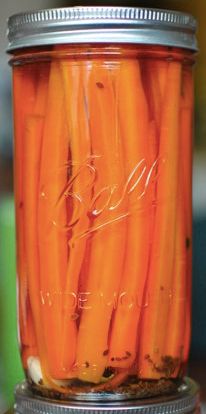
Pickled Dilly Carrots
Ingredients
1 ½ lbs carrots (trimmed to fit in your jars)
1 cup white vinegar
1 cup water
1 tablespoon pickling salt
1 teaspoon dill seed
½ teaspoon black peppercorns
2 cloves garlic
Instructions
- Bring a small pot of water to a boil in which to blanch the carrots.
- Prepare 1 pint and a half jar, or 2 12-ounce jelly jars. Place lid(s) in a small pot of water and bring to the barest bubble to soften sealing compound.
- Peel carrots and trim to fit jars. Cut into thin sticks.
- When the water comes to a boil, drop in the carrots and cook for either 90 seconds if you plan on canning your pickles, or 3 minutes if you’re making them as refrigerator pickles.
- When time is up, remove carrots from water and run under cold water to stop cooking.
- Combine vinegar, water and salt in a small saucepan and bring to a boil.
- Place spices and garlic cloves into the bottom of the jar(s).
- Pack carrots sticks upright in jar(s).
- Pour the boiling brine over the carrots, leaving 1/2 inch headspace.
- Tap jar(s) gently to remove air bubbles.
- Wipe the rims and apply the lids and rings.
- If you’re canning the pickles, process them for 10 minutes in a boiling water bath.
- When time is up, remove jar(s) from canner and let cool.
- Sealed jars can be stored in a cool, dark place for up to one year. Refrigerator pickles should be placed in the fridge as soon as the jars are cool.
- Let pickles rest in pickling liquid for at least 48 hrs before eating.
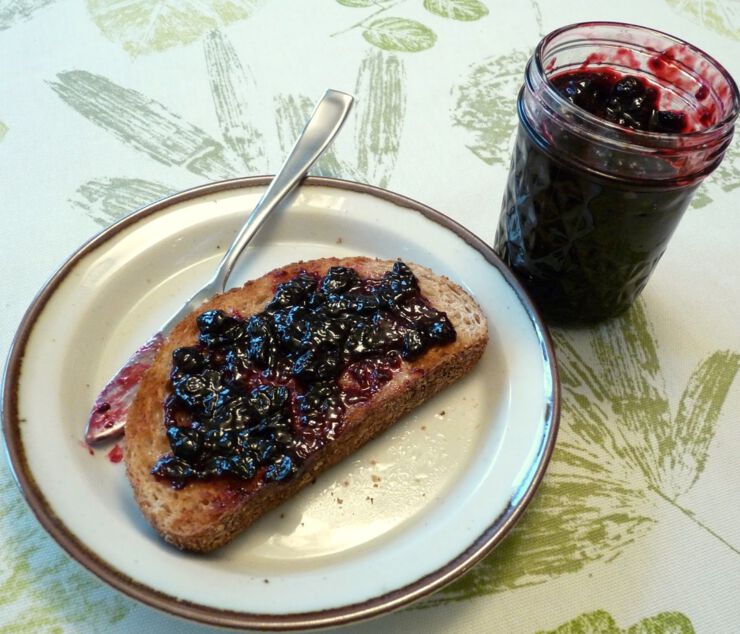
Haskap berry jam
Ingredients
4 cups haskap berries
2 cups white sugar
the juice of ½ lemon
Instructions
- Prepare 3 250 ml jars.
- Put the empty jars in a canning kettle and cover with water. Turn on the burner and bring to a boil. Boil bottles for 10 minutes.
- Meanwhile, wash and de-stem the haskap, and pick out any bad ones or debris.
- Put the haskap in a saucepan with the sugar and lemon juice. Bring to a boil, stirring frequently until the sugar is dissolved. Keep at a rolling boil, stirring only occasionally, until the mixture reaches the gell stage; about 20 minutes.
- Remove from the heat and skim off any obdurate foam that may have formed.
- Ladle into the jars. Wipe the lips and seal with lids and rims which have been brought to boil.
- Return the sealed jars to the boiling water bath, and boil for 5 minutes.
- Once the jars have sealed, label them with the month and year of their production, batch number if you are making more than one batch, and name.
- Keep them in a cool, dark place, but once opened, keep in the fridge.